


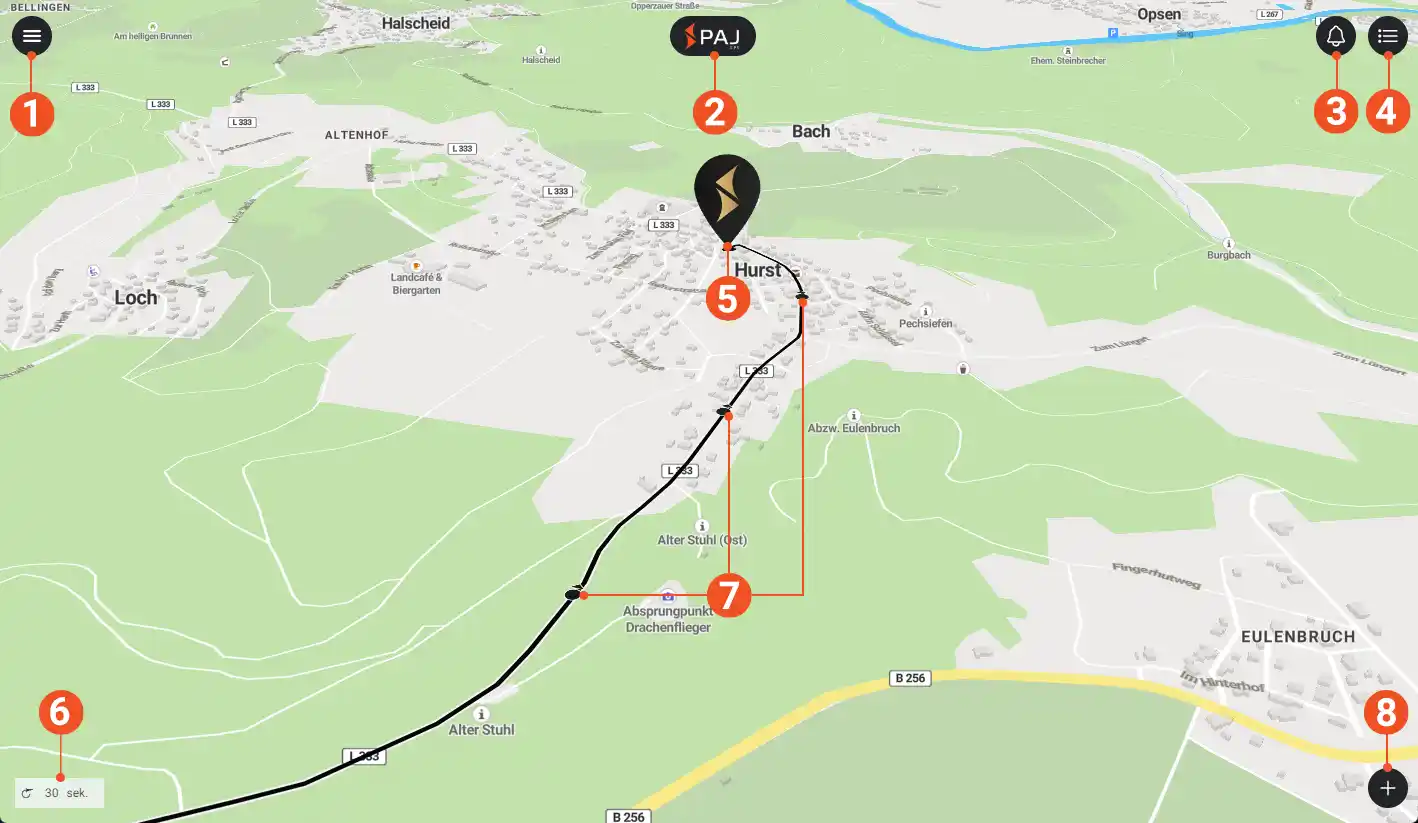


Main View (1/5)
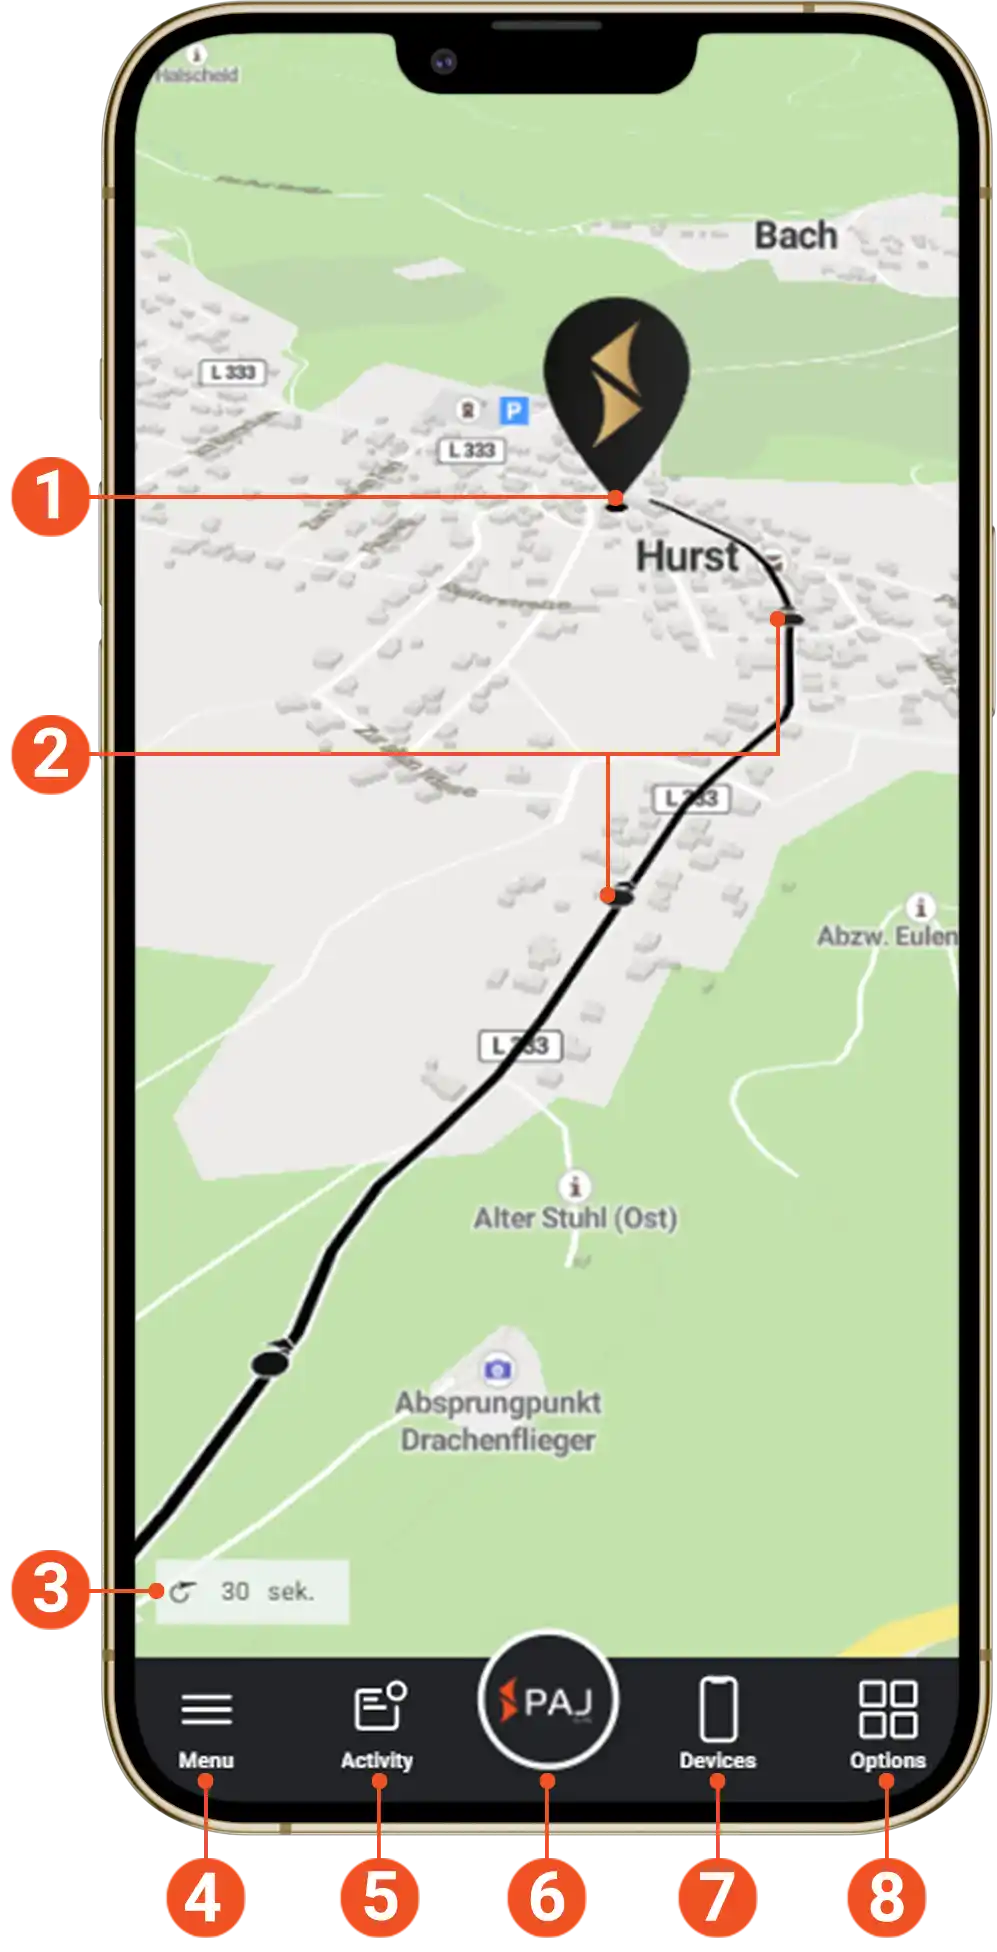
1 - Device location
This marker shows you the current position of your finder on the map.
2 - waypoints
You can get more information about the individual route points ( time , speed, etc.) by tapping on them.
Further details on how you can display the distance covered can be found in the overview of the device settings in Figure 4.
3 - update interval
The timer on the bottom left shows time until the next data transfer (the finder’s position is updated regularly if it is not in standby mode).
4 - Application menu
- view statistics
- device settings
- application settings
- alarm summary
- Extra functions such as logbook etc.
See the next picture for more information.
5 - Alarm notifications
Here you can find a quick view of the unread alarm notifications.
6 - Refresh page
Tap on the PAJ logo to refresh the page and reload the map.
7 - Device List
- Overview of your devices
- alarm settings
- distances covered; route export
- Customize device appearance
See picture 3 for more information.
8 - Options
Map view options, see image 5 for more information.
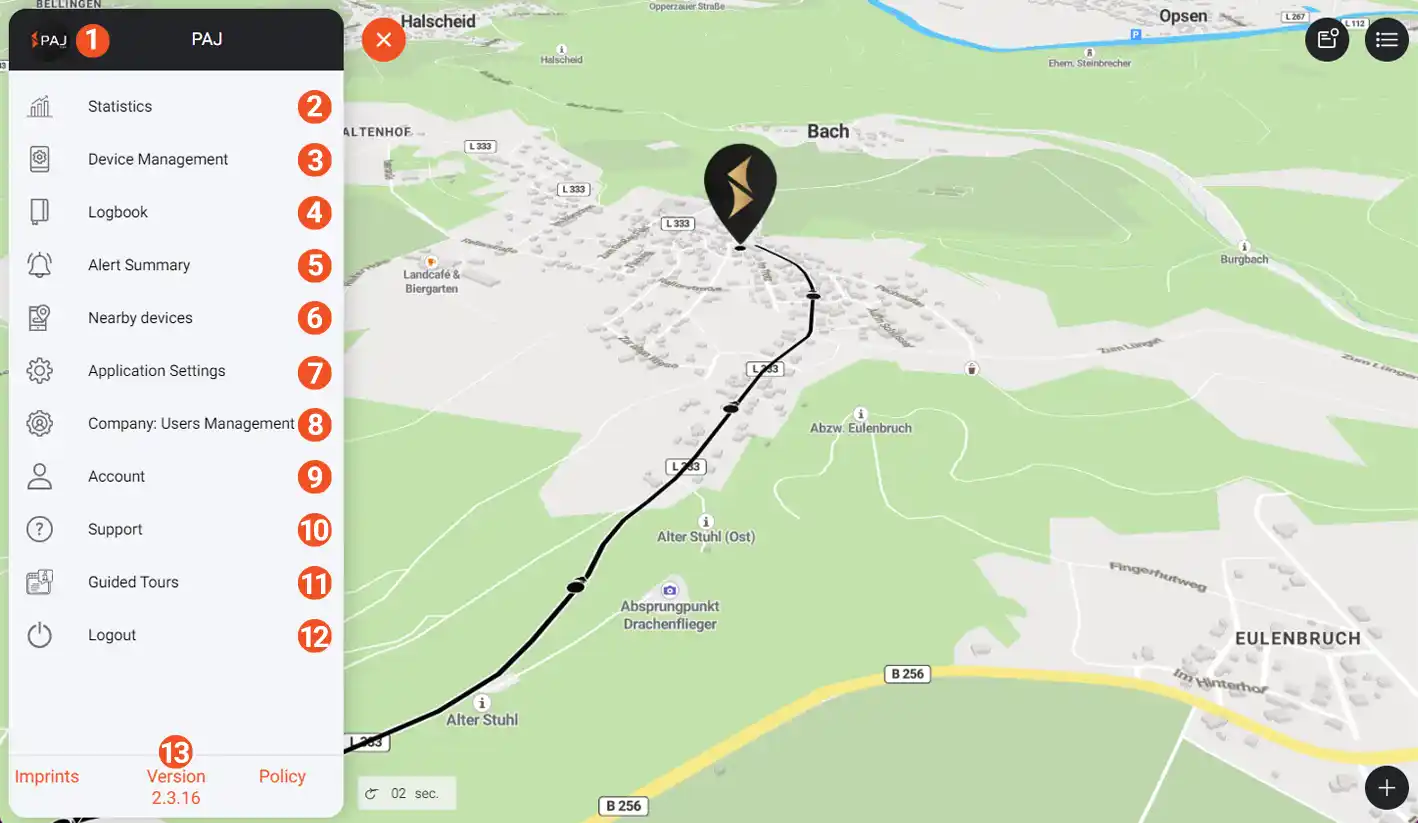
User Menu (2/5)
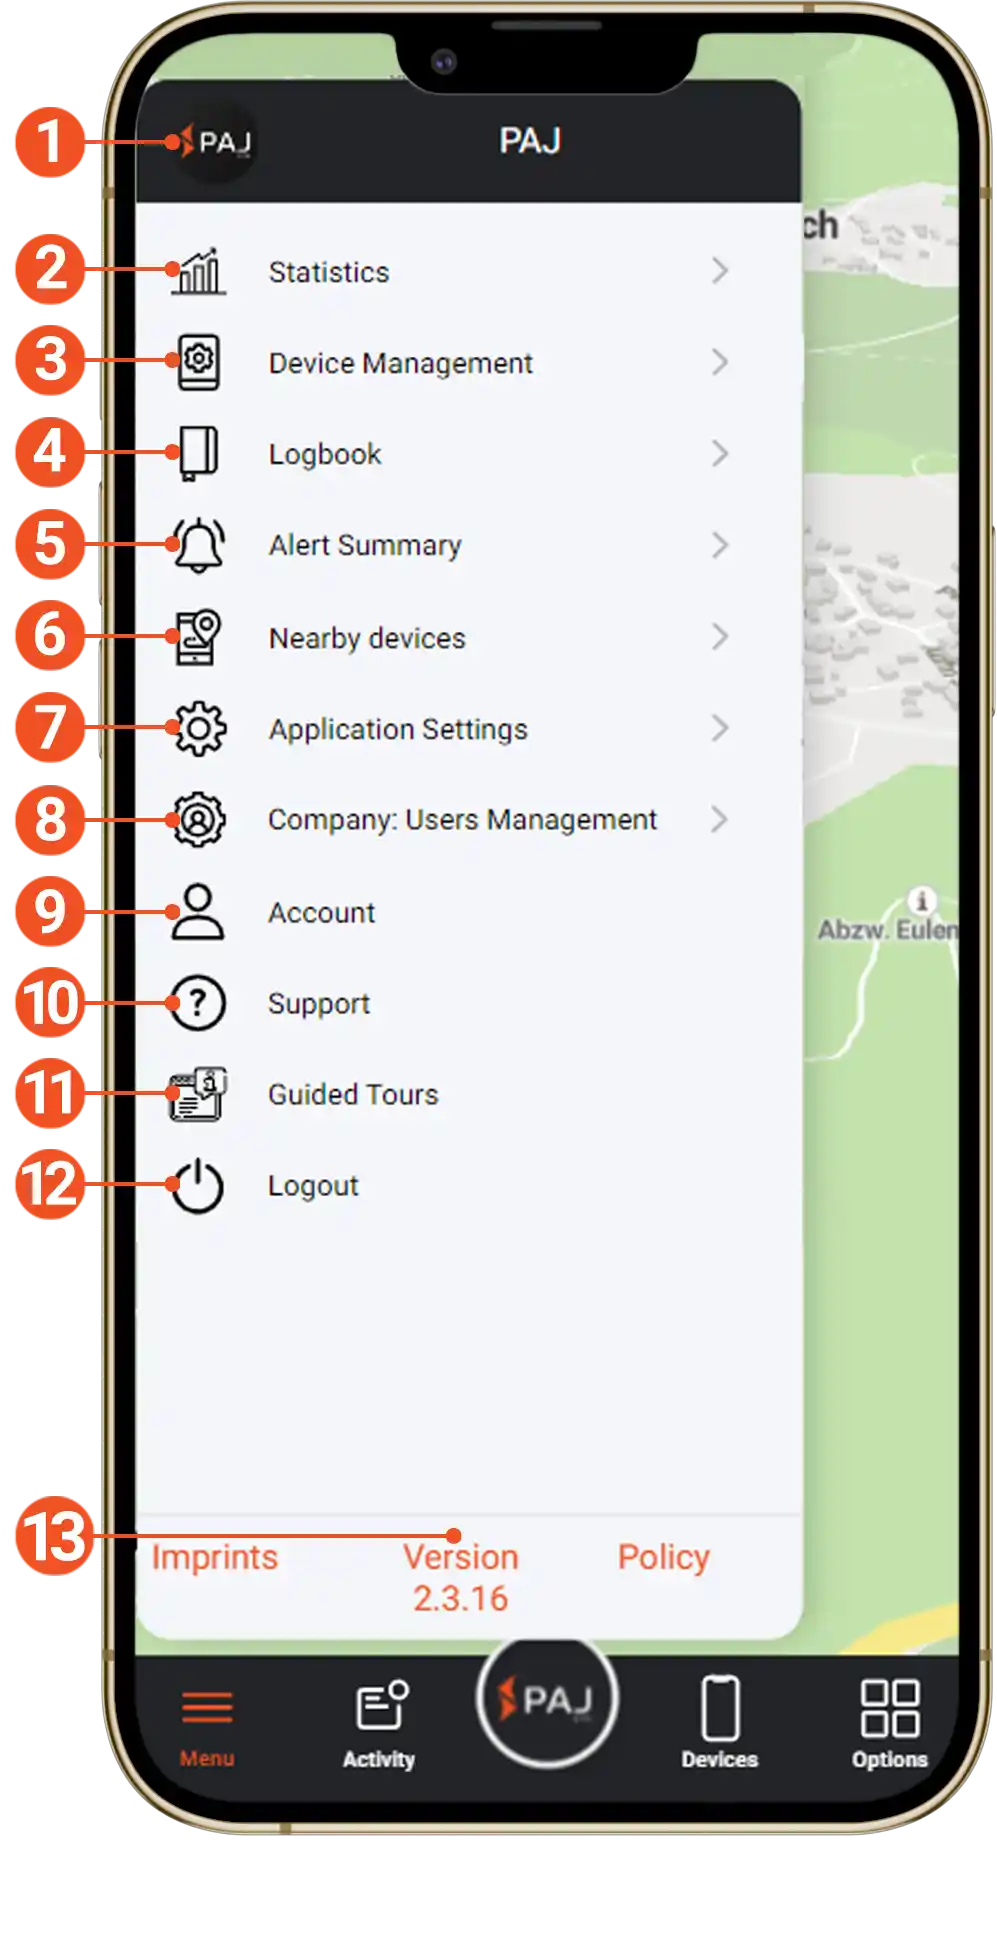
1 - Profile Picture
To store your own profile picture, simply click on the icon in the black area at the top left and upload any picture.
2 - Statistics
Statistics on distance , rides & breaks , speeds and activities can be viewed here.
3 - Device Management
Here you will find a list of all active devices and you can make settings for the individual devices .
4 - Logbook
Creation/route allocation/evaluation of your personal tax office-compliant logbook.
5 - Alert Summary
Overview of all triggered alarms. You can filter the overview by date, type of alarm, alarm status (read/unread) or by device.
You can also save up to 3 email addresses as alarm recipients and set the notification tone for the alarms individually.
6 - Nearby Devices
Select a location or use your own to see which of your finders is closest to that point.
You can also create a route from the Finder to a specific location here
( no automatic navigation option ).
7 - Application Settings
Make general portal settings:
- Display: dark mode, buttons in the device menu, settings in the map menu and much more
- Map: display settings and performance settings
- Notifications: Alert Recipients (Email Notification)
- App Modes: Presets for Vehicle, Pet, People, or Business usage
8 - Company: User Management
You can create sub-accounts and also manage the associated access rights via the company user administration . (This menu item is only available if you activate it via Application settings – App modes)
9 - Account
In the account settings you can view your orders , download invoices and also manage your licenses (pause, buy more, etc.).
You can also manage or change your personal addresses (or account data, payment methods) .
10 - Support
Do you have any questions, problems or do you need help in general? Then do not hesitate to contact our support. We are always at your disposal in the best possible way!
Please also click HERE if you would like to contact us.
11 - Guided Tours
Here you get a guided tour through the Finder Portal, so that the most important options are shown to you directly.
12 - Logout
Use this button to log out of your account.
13 - Version
Here you can see directly which version of the app you currently have activated.
Also, tap/click Execution to see the changes in the latest updates for the portal.
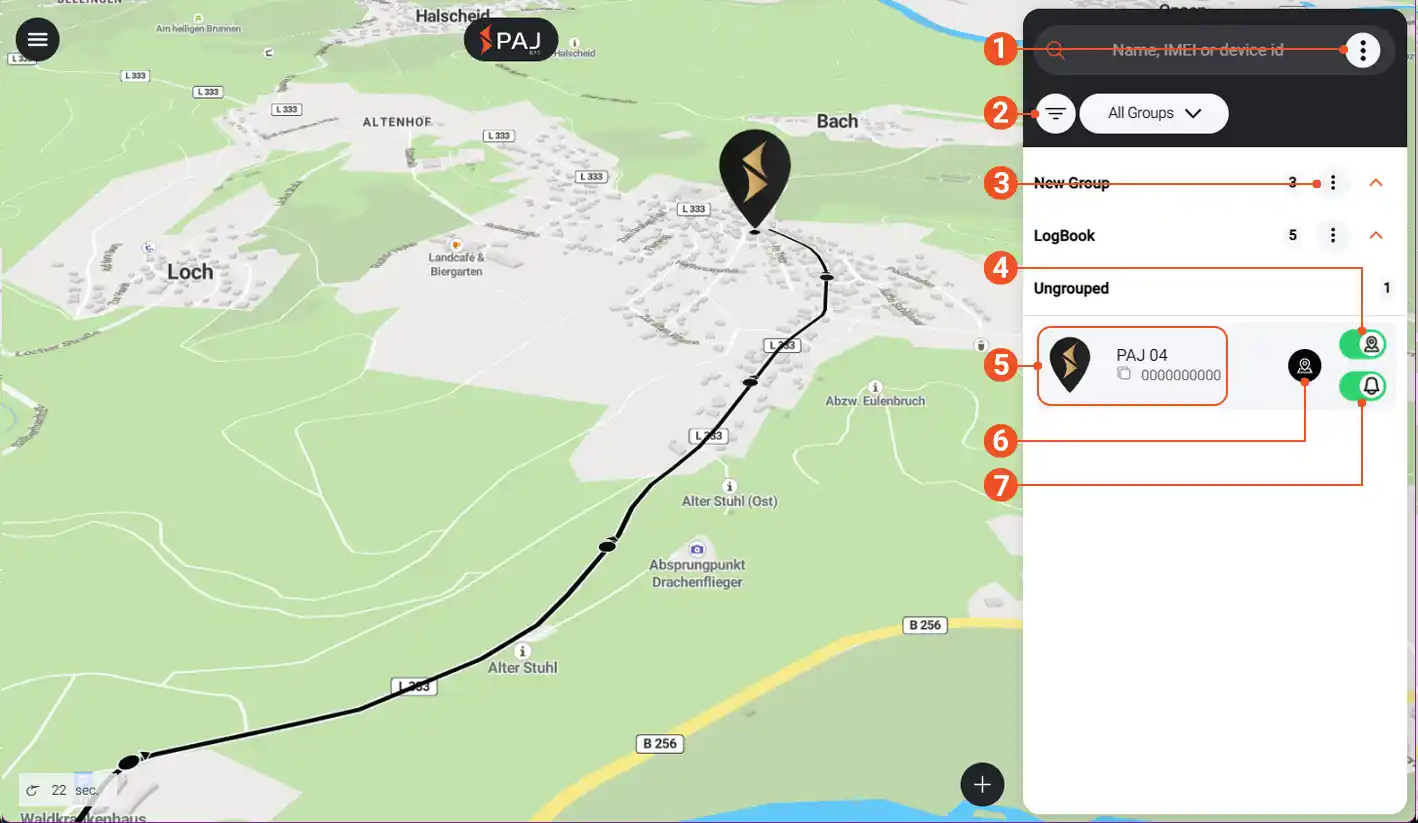
Device List (3/5)
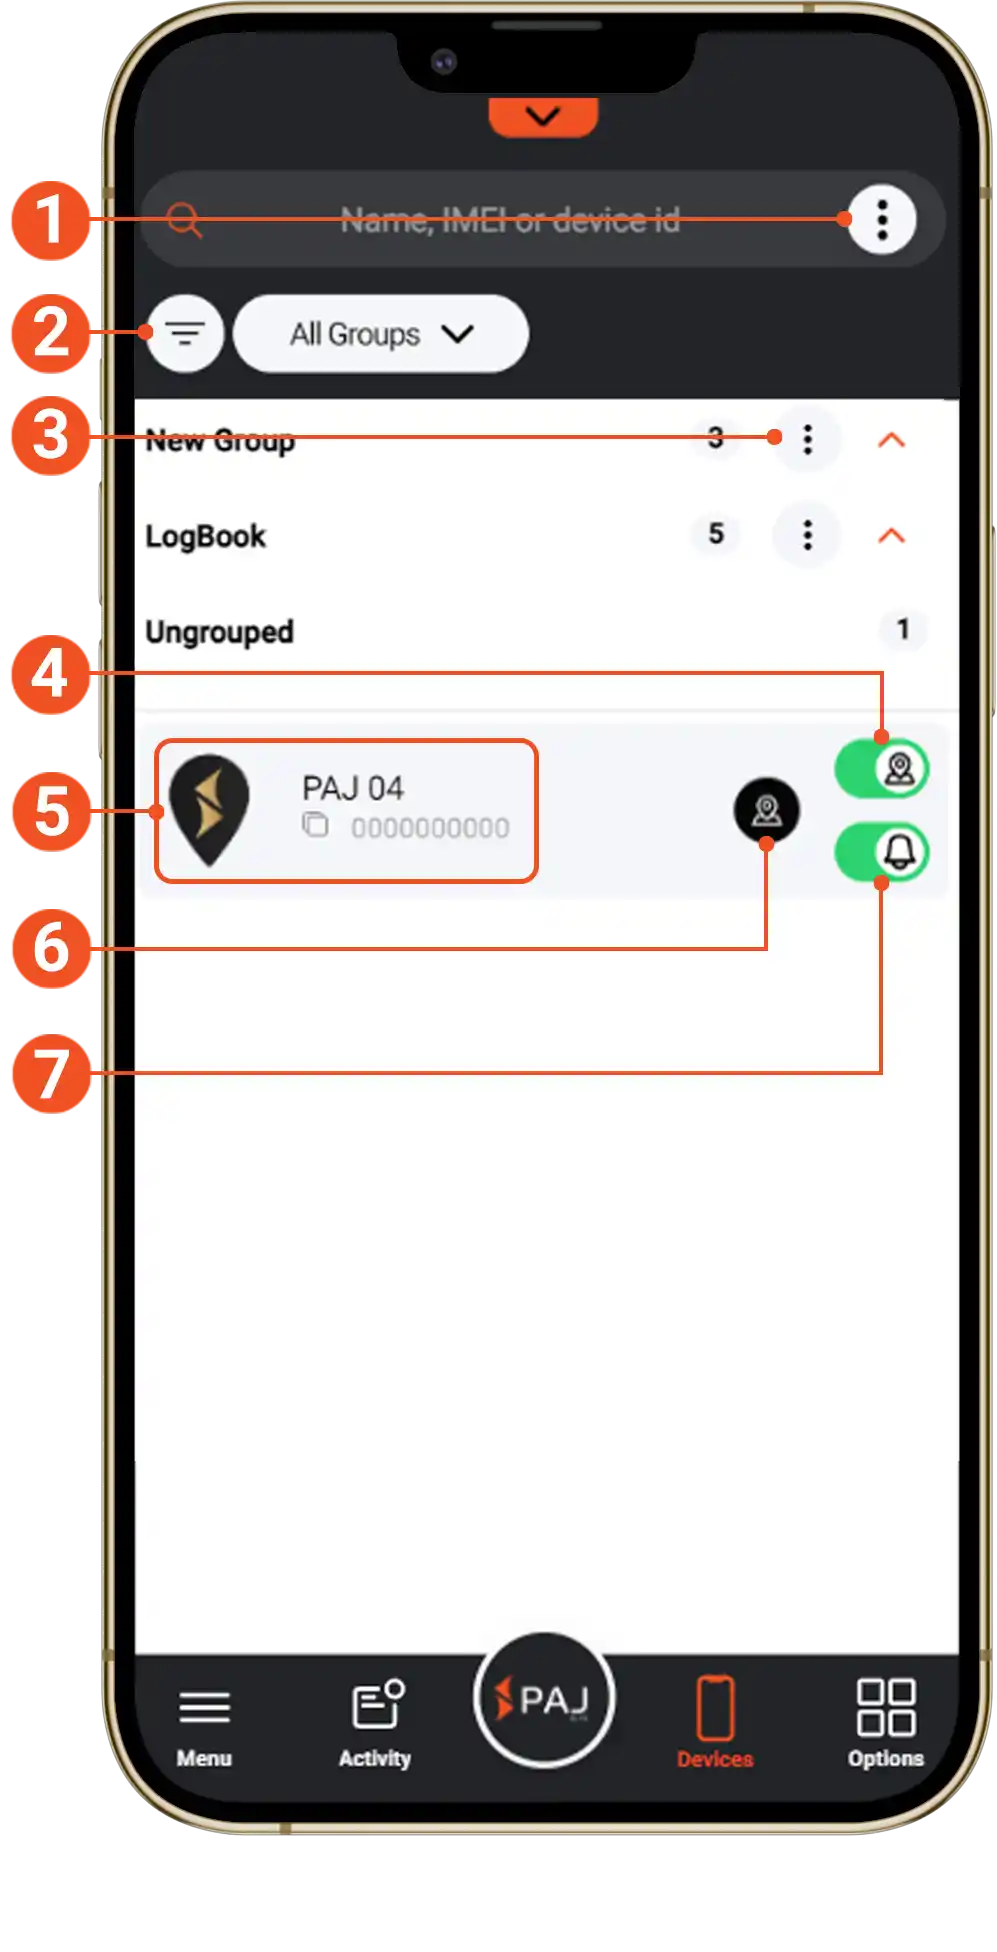
1 - List Options
Reorder devices, create groups, or toggle your Finder’s view on/off.
(Only visible from 4 active devices in the portal)
2 - Filter
Filter your devices or set a sorting method.
(Only visible from 4 active devices in the portal)
3 - Settings for this group
Here you can change the group name or delete the group.
4 - Location Indicator
Use this slider to toggle the Finder’s view of the map on and off.
(If the view is disabled, the routes for the respective device will no longer be displayed)
(If you do not see this slider, you can enable it in the application settings)
5 - Finder Settings
Tap this field to open the Finder browser . You can view general information , filter/export the route shown , enable/disable alarms and open device settings .
See the next image for more information.
6 - Centre Finder
When you tap this icon, the FINDER will be centered on the map so you can see your current location right away.
7 - Activate/Deactivate all alerts
Turn off or on any of your Finder’s already configured alerts with this slider. All preset configurations are retained.
(If you don’t see this slider, you can activate it in the application settings)
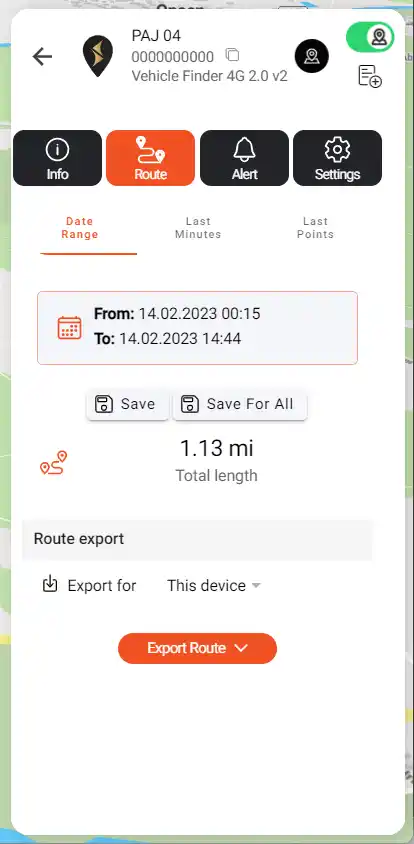
Device Settings (4/5)
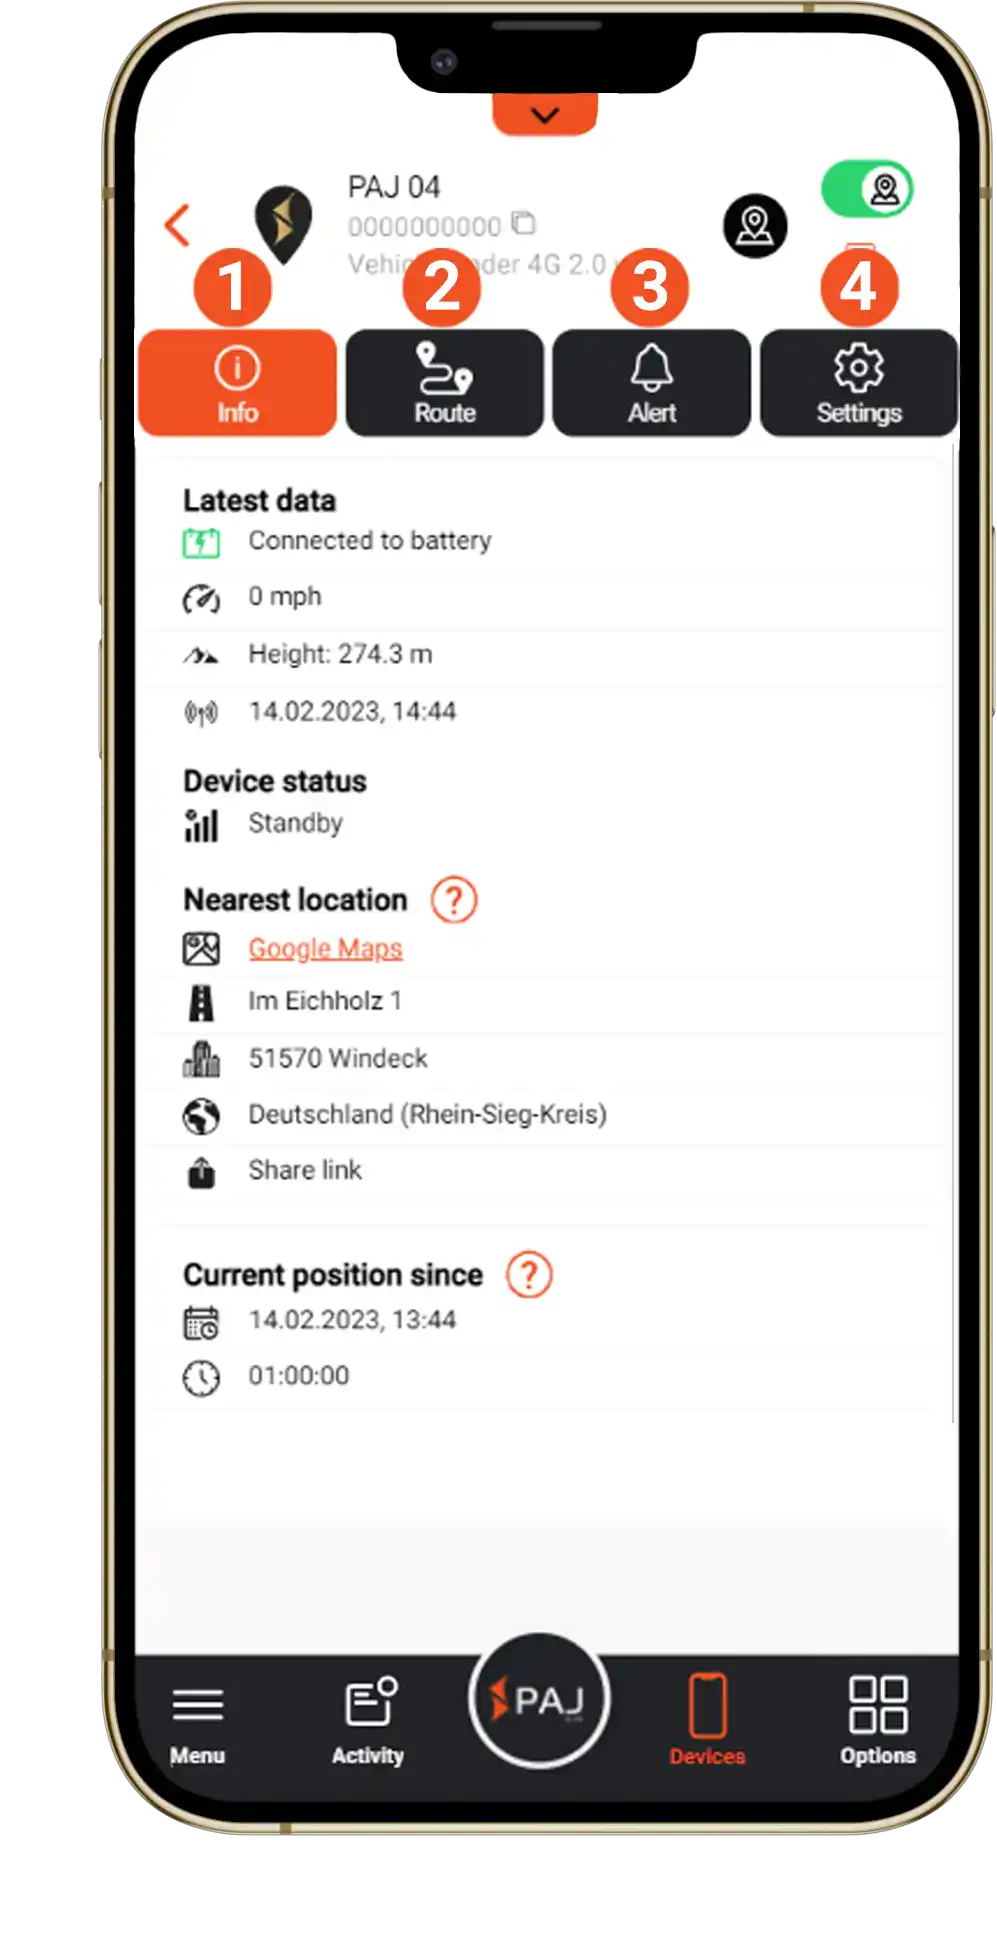
1 - Device Information
General information about the finder is displayed under ” Info
“: – Most recent data (last update of your finder)
– Device status (indicates whether the finder is active or in standby mode)
– Nearest position (approximate street name of the current location)
– Current position since (time the device was last moved)
2 - Route Settings


Filter the route displayed in the Finder according to the following criteria:
Date range, last minutes or last points –
After “Save” the route will be displayed on the map.
You can also export the displayed route. Different file formats are available here (for example .pdf or .gpx).
3 - Alert Settings

In this submenu, individual alarms can be activated/deactivated and configured .
Depending on the device model, other alarms may be available here. By clicking on the ” ? ‘ before the alarm, you will receive a detailed description and important information about the alarm.
4 - Device Personalisation
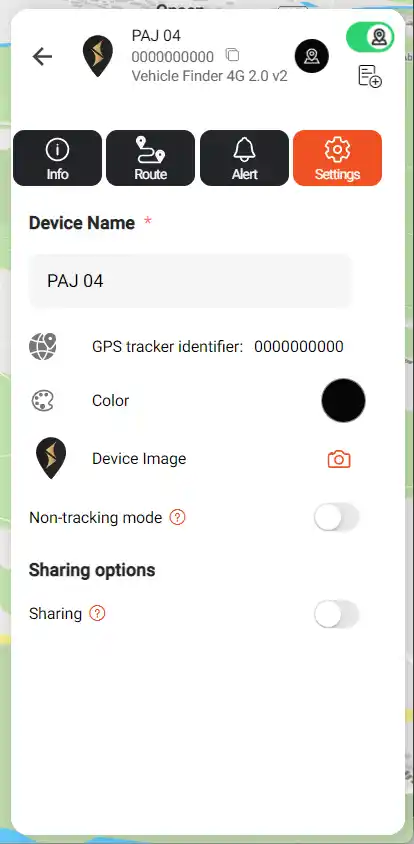
Here you can personalize your finder by e.g. B. rename, adjust the color of the route, or store an image.
In addition, the ” non-tracking mode ” can be activated, which means that the route is not recorded.
The “Share ” feature creates a sharing link, allowing other people to see the finder’s location and route.
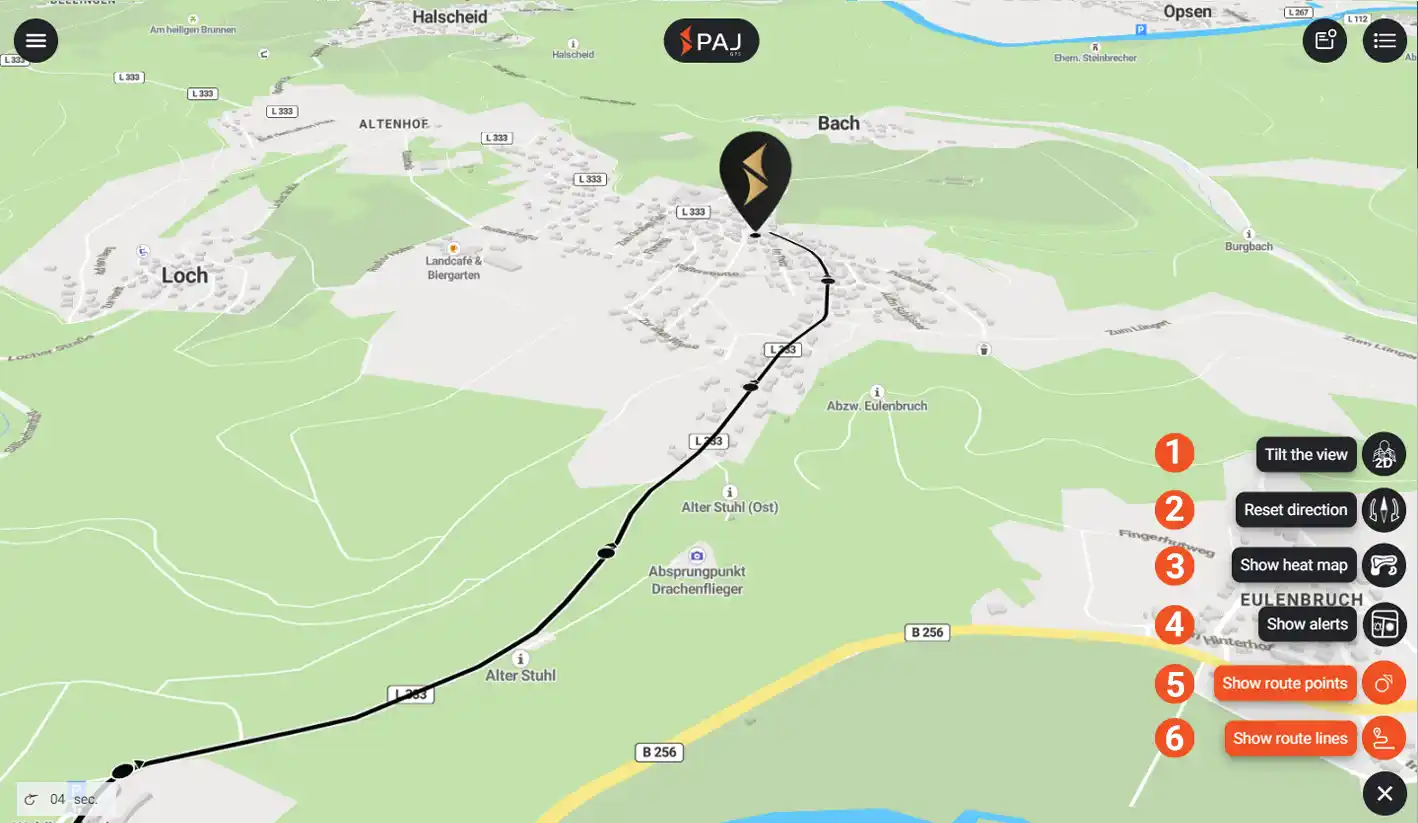
Options (5/5)
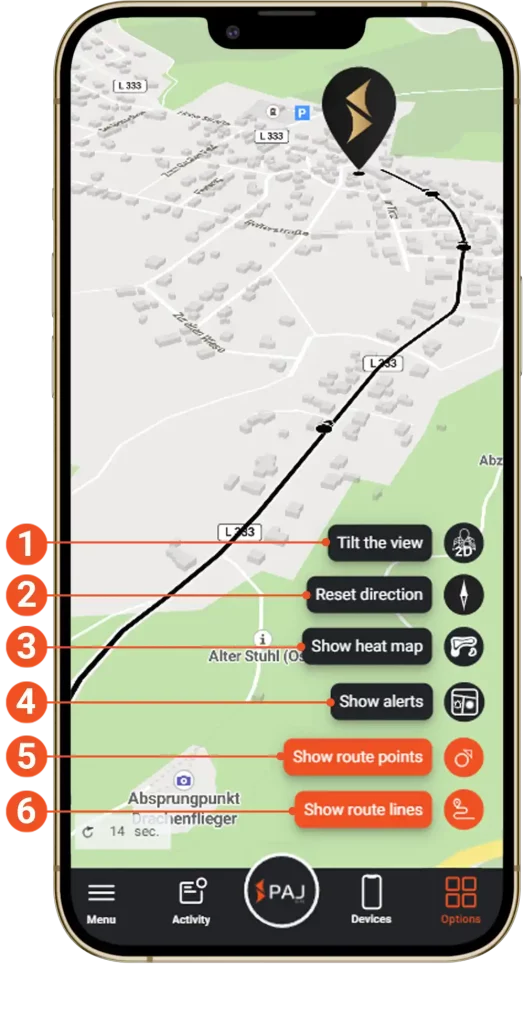
1 - Map View


With this button you can switch between the 2D and 3D view of the map.
2 - Map Orientation

You can use the compass to orient the map north , east, south , or west . You can also reset the alignment in this way if you have changed it manually.
3 - Heat Map

If you want to see the most used route , the portal’s heat map is the best choice.
The more often the same route is driven, the darker or redder it is displayed.
4 - Display Options

With the display options , you can show speed cameras , pause signals from the finder or triggered alarms on the map .
5 - Show Route Points
With this option you can switch the individual waypoints on or off .
You will then only be shown the course of the route.
6 - Show Route Lines

If you only want to see the waypoints, you can disable/enable the route here.